In my company we are using SCOM for monitoring our server environment.
Off hours we also get notified about critical alerts using a SMS/GSM modem.
Using default SCOM functionality we delay the sending of notifications by 5 minutes. This works fine for alerts with a “new” state.
However if an alert is closed within the 5 minute period a “closed” notification is sent out.
We do not want to see the closed alerts if an alert auto-resolved within the 5 minute time period. But if a new alert that has aged 5 minutes and sent to our GSM, we definately want to see that closed alert if it auto/manual resolves into the closed state (to make sure someone actually did something about the alert)
Pro tip: this post relies on basic Windows PowerShell skills. I can highly recommend O’reilly’s PowerShell cookbook to improve your basic PowerShell skills.
Using default SCOM functionality, this is not possible. This is why we came up with the following idea (special thanks to my colleague Frank):
- Using two seperate subscriptions, one for “new” alerts and one for “closed” alerts.
- On the new alert subscription set a channel with a powershell script to update custom field 1 when a SMS has been sent (this subscription has the 5 minute delay)
- On the closed alert subscription set a condition to check custom field 1 to see wheter a SMS has been sent or not.
This blog post describes how this can be done within SCOM.
1. The Command Notification Channel
First we have to create a “Command Notification Channel”. Go to the “Administration” section of the SCOM management console. Click on Notifications->Channels.
Right click and select “New->Command…”.
The following wizard appears:
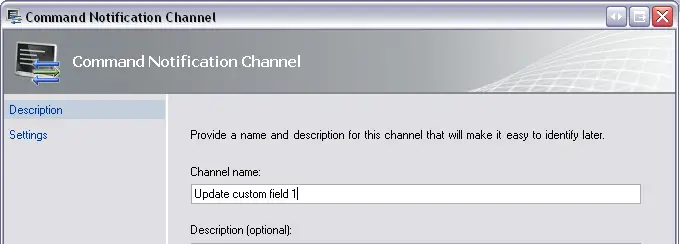
Give the channel a name, and click “Next >”
Enter the following settings for the channel:
Full path of the command file:
C:\Windows\System32\WindowsPowerShell\v1.0\powershell.exe
Command line parameters:
-Command “& D:\Scripts\UpdateAlertCustomField.ps1 -alertid:”$Data/Context/DataItem/AlertId$””
Startup folder for the command line:
D:\Scripts
Change D:\Scripts to reflect your PowerShell script location. It should now look like this:
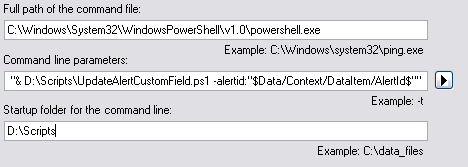
Save the changes by clicking “Finish”
2. The used PowerShell script
To modify alert “custom field 1”, I use a small PowerShell script. The text written into the field is “Notification sent out”
The used script is displayed here, save this script as “UpdateAlertCustomField.ps1” in the directory specified in the command notification channel above.
# Get alertid parameter Param($alertid) $alertid = $alertid.toString() # Load SCOM snap-inn add-pssnapin "Microsoft.EnterpriseManagement.OperationsManager.Client"; $server = "localhost" # Connect to SCOM new-managementGroupConnection -ConnectionString:$server; set-location "OperationsManagerMonitoring::"; # Update alert custom field $alert = Get-Alert -id $alertid $alert.CustomField1 = "Notification sent out" $alert.Update("Custom field 1 updated by UpdateAlertCustomField script")3. A subscriber for the command
The next step is to create a subscriber which has the command notification channel created above assigned as channel.
Go to the “Administration” section of the SCOM management console. Click on Notifications->Subscribers.
Right click and click “New…”In the “Notification Subscriber Wizard” give the new subscriber a name. In the next step of the wizard, specify your schedule as desired.
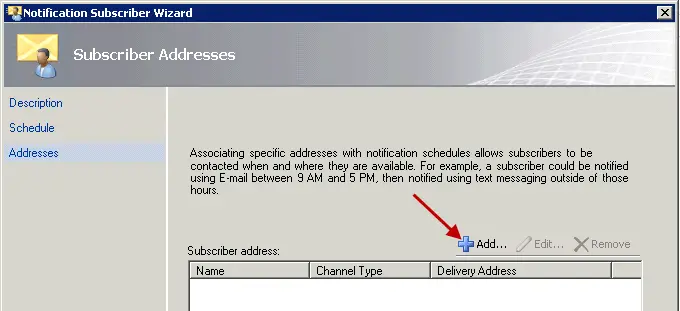
On the “Addresses” step, click “Add…” to add a new address.
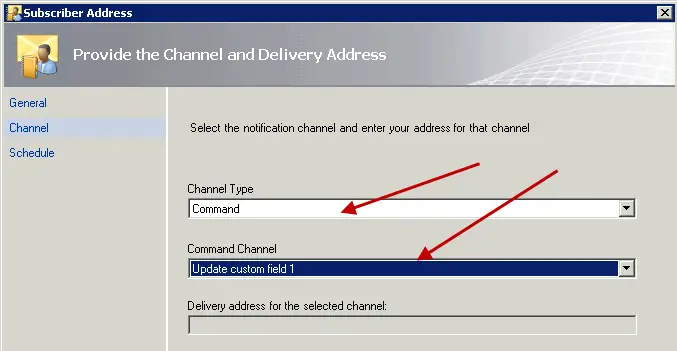
In the “Subscriber Address” wizard, specify a name for the new subscriber. This can be virtually anything as no e-mails/pages/SMS messages are sent anyway.
Next, specify the “Command” channel type and select the Command channel we created earlier (Update custom field 1).
Specify your schedule as desired, click “Finish” to end the wizard. Click “Finish” again to close the “Notification Subscriber Wizard”.
You should now have a subscriber with the command channel as asigned channel.4. The subscription for new alerts
Now that we have the command notification channel, powershell script and subscriber ready. We can create a new subscription for new alerts.
Go to the “Administration” section of the SCOM management console. Click on Notifications->Subscriptions.In the “Notification Subscription Wizard” specify a name for the new subscription. The next wizard step is the step to define criteria for the subscription.
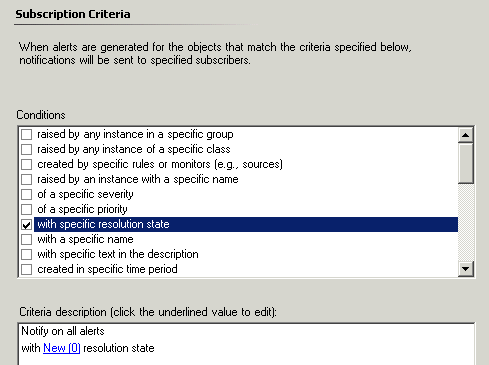
Specify atleast the “with specific resolution state” criteria, offcourse you can add your own other criteria here like you would normally do.
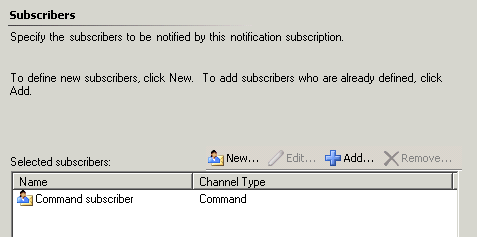
On the next wizard page (Subscribers) add the command subscriber we created in step 3, as shown below.
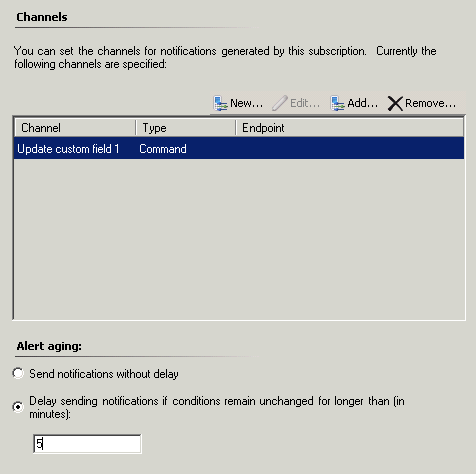
In the next wizard step (Channels) add the command channel we created in step 1 and specify the desired delay (5 minutes in this case). As shown below:
Click “Next”, in the summary step make sure “Enable this notification subscription” is checked and click “Finish”.
You should now have an subscription ready for new SCOM alerts.5. Subscription for closed alerts
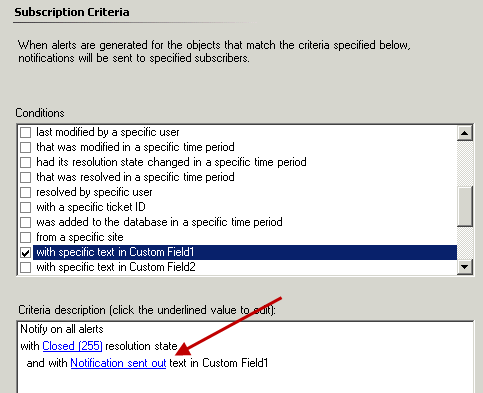
You can create the subscription channel like you would normally do. The only important step is to get the criteria right. We have to include custom field 1.
This is how the closed subscription criteria look:
NOTE: there is currently a bug in SCOM R2 when using custom fields in a subscription criteria!
For more information about thihs bug visit the following URL:
You have to update the xml file each time you change something in either of the notifications!

I confusing.
How can I get AlertID.
01 # Get alertid parameter
02 Param($alertid)
03 $alertid = $alertid.toString()
Looks like I got null value all the times.
How can I testing to get AlertID in powershell.
Please see following detail:
>Command “& D:\Scripts\UpdateAlertCustomField.ps1 -alertid:”$Data/Context/DataItem/A
lertId$””
Get-Command : The term ‘& D:\Scripts\UpdateAlertCustomField.ps1 -alertid:’ is not r
ecognized as the name of a cmdlet, function, script file, or operable program. Chec
k the spelling of the name, or if a path was included, verify that the path is corr
ect and try again.
At line:1 char:8
+ Command <<<< "& D:\Scripts\UpdateAlertCustomField.ps1 -alertid:"$Data/Context/Da
taItem/AlertId$""
+ CategoryInfo : ObjectNotFound: (& D:\Scripts\Up…d.ps1 -alertid::S
tring) [Get-Command], CommandNotFoundException
+ FullyQualifiedErrorId : CommandNotFoundException,Microsoft.PowerShell.Comman
ds.GetCommandCommand
Hi,
I modified the script and it working fine for me.
# Get alertid parameter from $Data/Context/DataItem/AlertId$
Param($alertid)
$alertid = $alertid.toString()
# Start Logging
$logStart = (get-date -format u)+|+$alertid+|+————-+|\nadd-content $logStart -path D:LogfilesUpdateCustomFeilds.log
# Initializing the Ops Mgr 2007 Powershell provider
# Enter SCOM Mangement Server
$rootMS = ‘HK-AGSCOM-2001’
# Add Operation Manager Snap-in
add-pssnapin Microsoft.EnterpriseManagement.OperationsManager.Client -ErrorVariable errSnapin ;
set-location OperationsManagerMonitoring:: -ErrorVariable errSnapin ;
# Connect to SCOM Management Group
new-managementGroupConnection -ConnectionString:$rootMS -ErrorVariable errSnapin ;
set-location $rootMS -ErrorVariable errSnapin ;
# Get alert information and update custom feild
$alert = Get-Alert -id $alertid
$NetBiosName = $alert.NetbiosComputerName
$hostname = $NetBiosName.ToUpper()
$alert.CustomField1 = Notification Sent Out\n$alert.CustomField2 = $hostname\n$alert.Update(\)
# Write Logging
$logEnd = (get-date -format u)+|+$alertid+|+$hostname+,|+$alert.Severity+|+$alert.Name
Write-Host = $logEnd
add-content $logEnd -path D:LogfilesUpdateCustomFeilds.log
# Remove Operation Manager Snap-in
Remove-PSSnapin Microsoft.EnterpriseManagement.OperationsManager.Client
Hi Maarten,
I found problem when subscription with New(0)resolution state with delayed 5 min as step above.
but it generated looping every single New alerts and send e-mail notification every 5 min.
Do you have any idea how to fix this?
Thanks in Advance,
Jobbo
Hi
I am using similar customized solution provided by tao yang.
I have powershell script that I am running whena new alert is triggered and this scrip take alertid and recepient as param and it get the info about the alert and compose in html format and send it as email.
so far it is working fine. It is working with regular command channel and subscriptions etc.
just to test it rigrously, i created another scom smtp based chanel and subscrition and found that my script sending customized alert info is not processing some alerts, but I am getting those alert related emails using SCOM smtp channel.
Criteria for subscription is exactly same on both subcription.
Any suggestions/help on this.
rgds
manish
In case this helps anyone out; I got rid of the looping by adding an extra condition for the New alert.
In Step 4 above, under the Subscription Criteria, include a criterion that says last modified by a specific user. For the user, specify %SYSTEM%.
The reason why it keeps sending out emails is that each time the alert is updated, the system sends out an update through the subscription. In this case though, the subscription updates the alert, which causes the system to send out an update through the subscription, which updates the alert, etc… If you right-click on the Alert and go to Properties, under the History tab you’ll see this happening.
What the workaround does is that it tells the system to only send an update if the alert was modified by the system account. This doesn’t create the looping because the script modifies the alert with the SCOM service account. Again, you can see which account modifies the alert by right-clicking on it, going to Properties, then looking at the History tab. Now, if your SCOM service account is SYSTEM, then the workaround won’t work. 🙂
Hopefully this makes some sense and will help someone out. Took me a while to figure out what was going on.
Hello,
Is not working corectly if the alert is updates repeat count faster..
http://social.technet.microsoft.com/Forums/en-US/operationsmanagergeneral/thread/e09826cc-7b4e-4daa-bfe8-095b80dc95b2/
I just change the sript like this 😉
If (!$alert.CustomField1)
{
$alert.CustomField1 = “Notification sent out”
$alert.Update(“Custom field 1 updated by UpdateAlertCustomField script”)
}
shoud work better..
SMS notification schedule
Hi Guys,
Need advice, i have SMS notification send after hours. The schedule is Date Range : Always ; Weekly recurrence: Except from 07:00 AM To 08:00 PM; on the selected days of the week : Monady to Friday. Then the second Schedule is always, all day, weekend days.
The problem i have, i olny recieve sms notification only on weekends.
is there any otherway to configure schedule time.
Hi I’m from the SCOM support team @ Microsoft.
While configuring the notification channel and passing the parameter of alert id, enclose it this way – “‘$….$AlertID$'”
Variable Name
The above solution won’t work when the Alert ID is a GUID that starts with a number. For e.g. 4ab1231-12312sdf-1asfsdaf will not work.
Hi Sanjeev, thanks for your addition!
I can not get this to work with SCOM 2012 R2.
get the following in the event log:
The process could not be created because the maximum number of asynchronous responses (5) has already been reached, and it will be dropped.
Command executed: “C:\Windows\System32\WindowsPowerShell\v1.0\powershell.exe” -Command “& D:\Scripts\UpdateAlertCustomField.ps1 -alertid:”{8ab4d093-1d8c-4a41-92ff-a027c30649a2}””
Working Directory: c:\Scripts
One or more workflows were affected by this.
Workflow name: Subscription2195677b_b2b5_4b27_ac6a_fcb1994e7f2f
Instance name: Alert Notification Subscription Server
Instance ID: {E07E3FAB-53BC-BC14-1634-5A6E949F9230}
What am I missing?
Thanks
M.