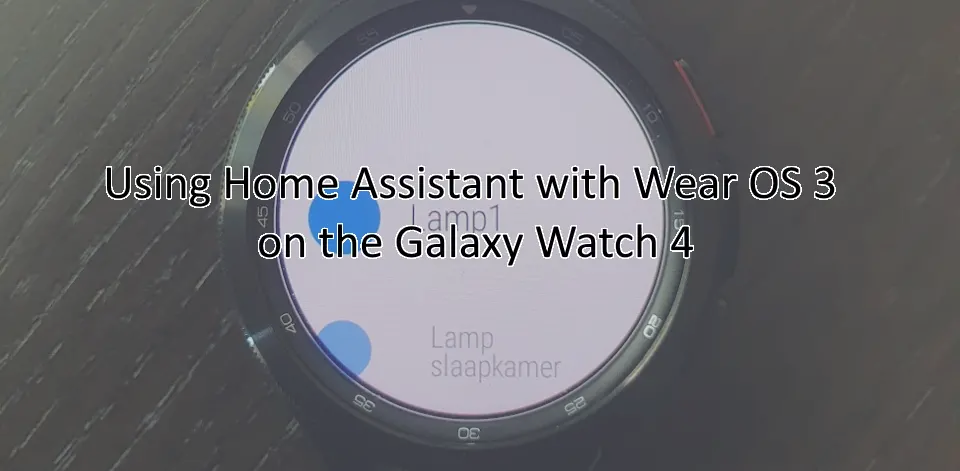
The time is finally come! Samsung have released their Galaxy Watch 4 series of watches. It features Google Wear OS 3. and it comes in two models, being the standard model and the watch 4 classic. In this article we will be looking at the possibilities of using Home Assistant in combination with this new watch running on Google Wear OS 3.
Can I use Home Assistant on the Galaxy Watch 4 running Wear OS 3?
Currently the development of Home Assistant for the Wear OS platform has been in development for quite some time. The first commit in their Github repository was found on 22 december 2020. Since then there has not been a lot of development on the front. Currently the Home Assistant application for Wear OS just displays a Home Assistant logo. So to answer the question, Home Assistant currently does not support Wear OS 3 natively. I do expect the development to get a boost now that more premium smart watches running Android are out there. If you are like me you most likely don’t want to wait for the official app to appear.
Luckily there are currently some alternative methods you can leverage today to control Home Assistant from your new Galaxy Watch 4 series. In this article we will take a look at these alternatives.
Using Home Assistant on the Galaxy Watch 4 using AutoWear and Tasker
The first alternative method is going to be a quite complex one. I explored using AutoWear and Tasker to control Home Assistant from my smart watch. I got it working but it requires quite a lot of setting up. I have described all the steps I took below. The global steps you need to take include:
- Create a Long-Lived-Access token in Home Asisstant.
- Integrating Tasker with Home Assistant using a Long-Lived-Access token and the Home Assistant plug-in for Tasker.
- Create a custom screen in AutoWear that calls the specified Tasker task.
- The Tasker task then tries to fire the specified event to Home Assistant.
Step 1: creating a Long-Lived-Access token in Home Assistant
First we need to create a Long-Lived-Access token. We will use this token, that is valid for 10 years after being generated, to allow Tasker to connect to our Home Assistant installation. To create the Access Token you need to follow a couple of steps:
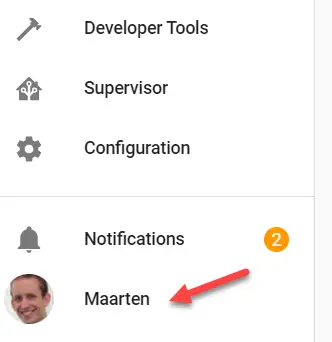
1. Login to your Home Assistant web interface. For example: http://ha.local:8123
2. From the web interface go the profile section. You get there by clicking on your name.
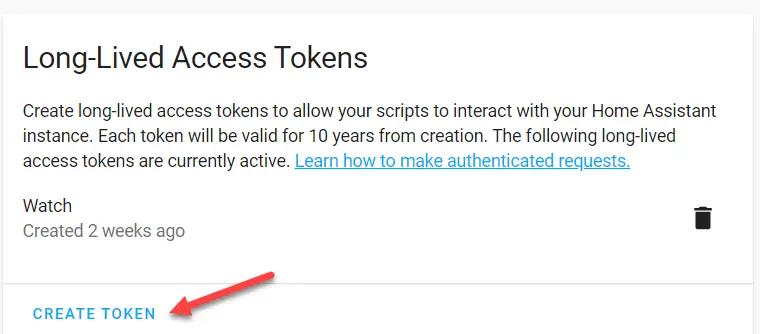
3. In here you find the Long-Lived-Access token section. Click on Create Token.
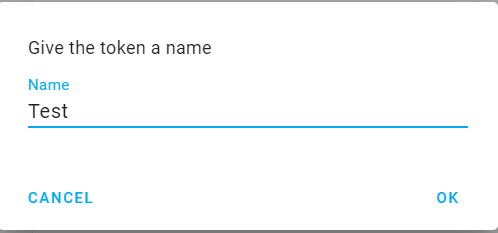
4. Enter a name for the token, and click on OK
5. You will now see your generated token. Make sure you copy it somewhere safe, as it won’t be shown again.
A word of warning, this token allows full access to your Home Assistant installation, so make sure you keep this safe.
This concludes the steps required to generate the access token. We will now continue with integrating Tasker and Home Assistant.
Step 2: Integrating Tasker with Home Assistant by using a Long-Lived-Access token
Now we need to be able to control Home Assistant from Tasker. To do so we are going to utilize the Home Assistant plug-in for Tasker. I will guide you through the installation of Tasker through some steps. After that we need to configure the plug-in. Finally we will create some tasks in Tasker to actually switch some lights. But you could also fire certain automations for example. Tasker is highly flexible and the only limit is the Home Assistant API itself.
So it is a tough cookie to get through if you look at the set-up of it all, but it does provide you with great functionality. Enough talking, let’s get started:
1. Download the Tasker app from the Google Play Store. And carefully follow the basic set-up steps of Tasker. This is beyond the scope of this blog post.
2. Next download the Home Assistant Plug-in for Tasker from the Play Store.
3. Open Tasker, go to the Tasks tab and click on the + sign to add a new task.
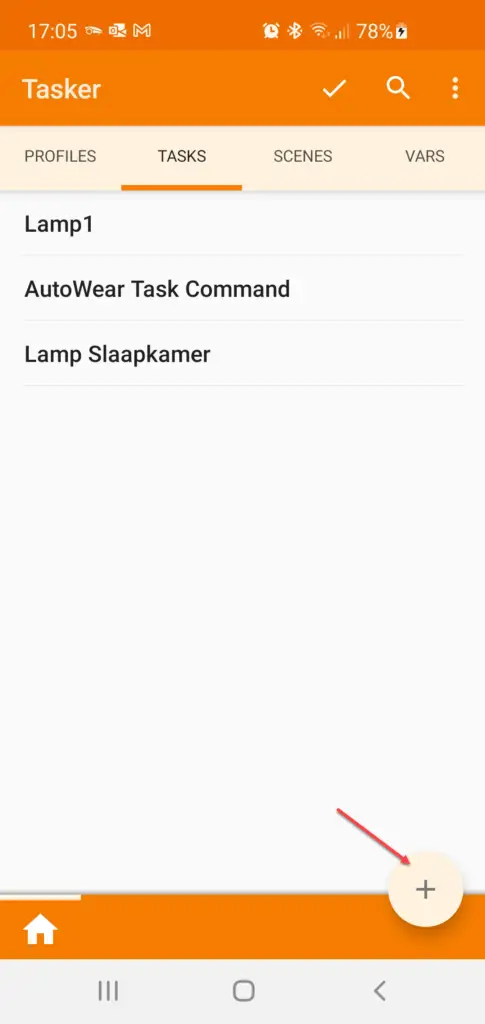
4. Give the Task a reasonable name for example: “Switch office light”
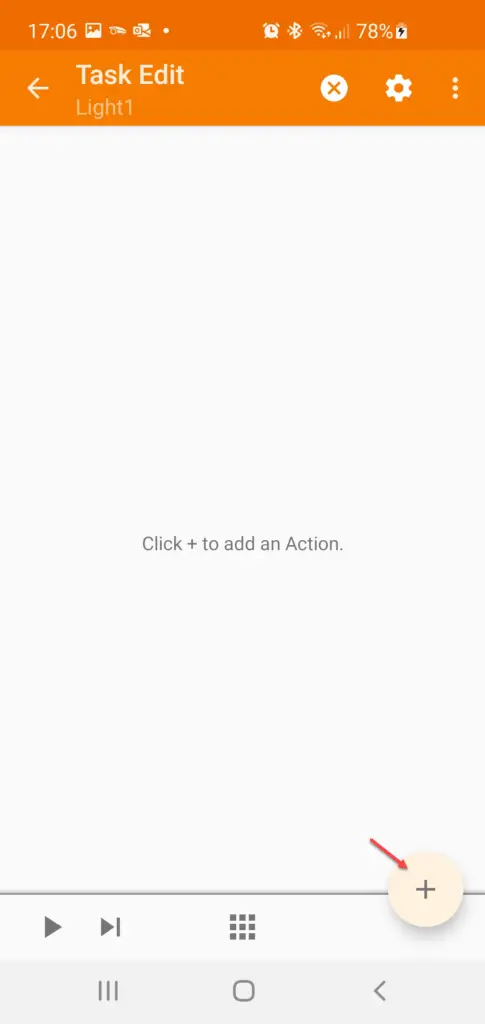
5. You should now end up in the Task Edit window. From this window click on the + sign to add a task action.
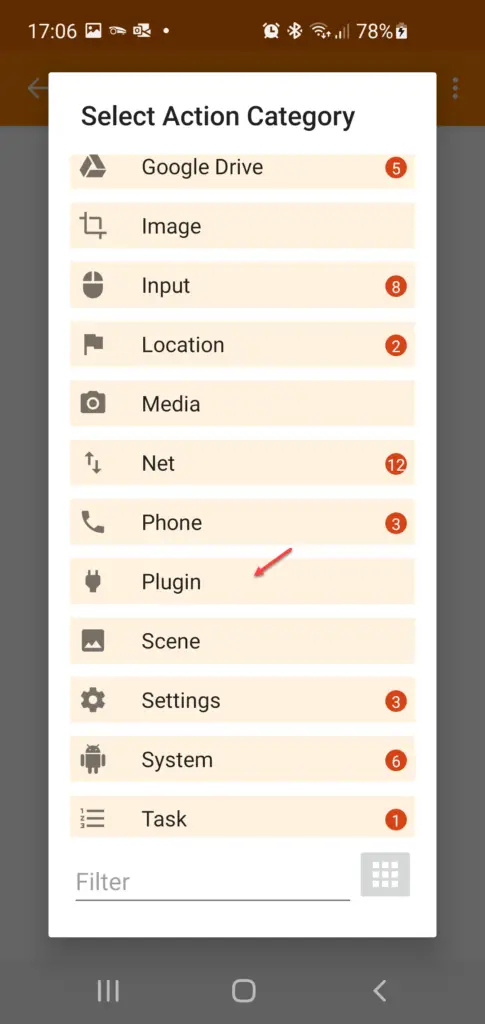
6. From drop down Action Category menu select Plugin as category action.
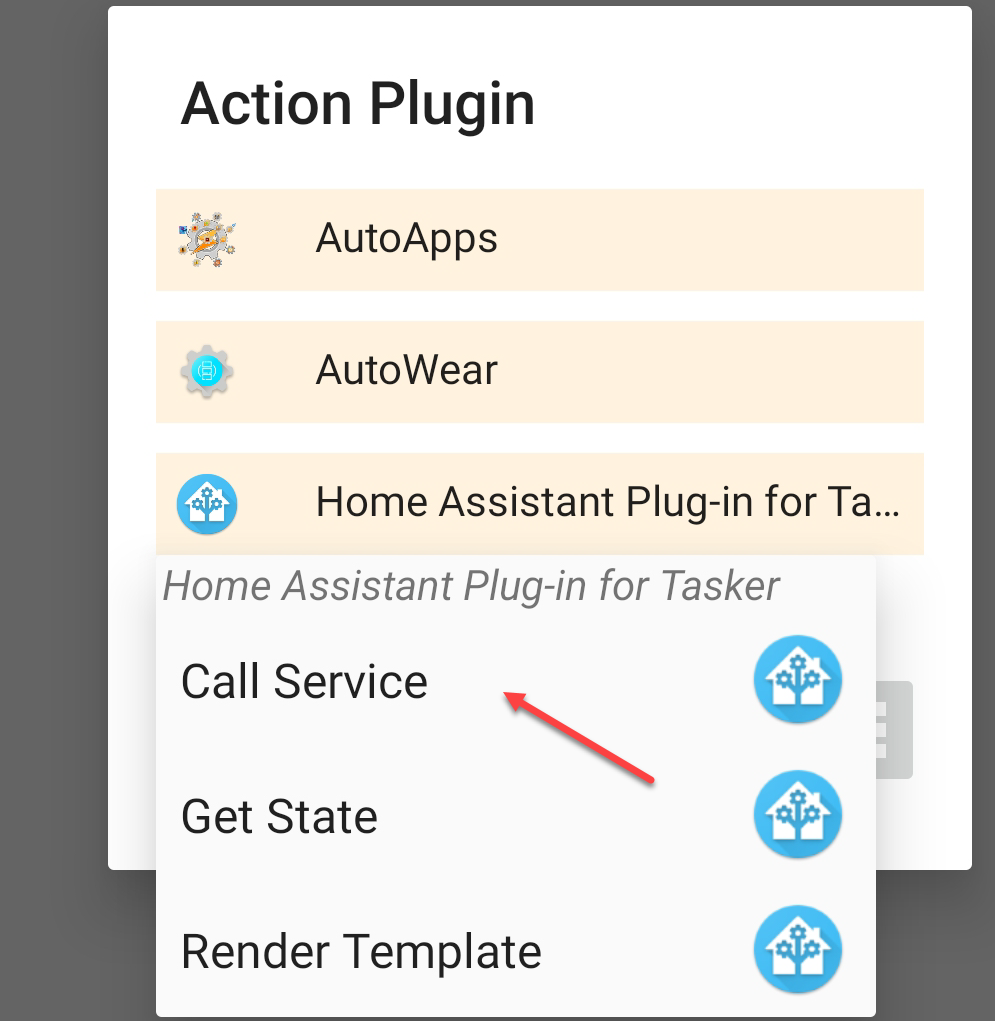
7. From the Action Plugin window select Home Assistant Plug-in for Tasker.option.
8. From the pop-up select Call Service.
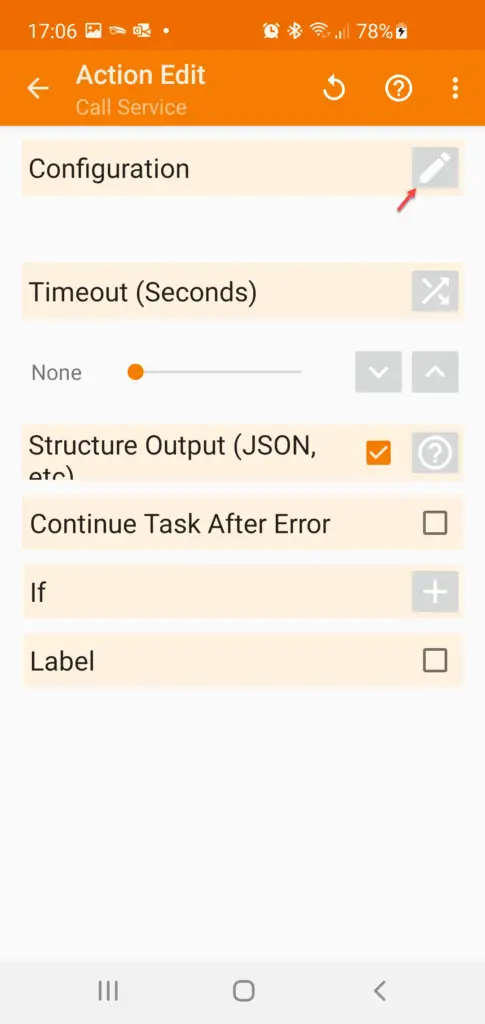
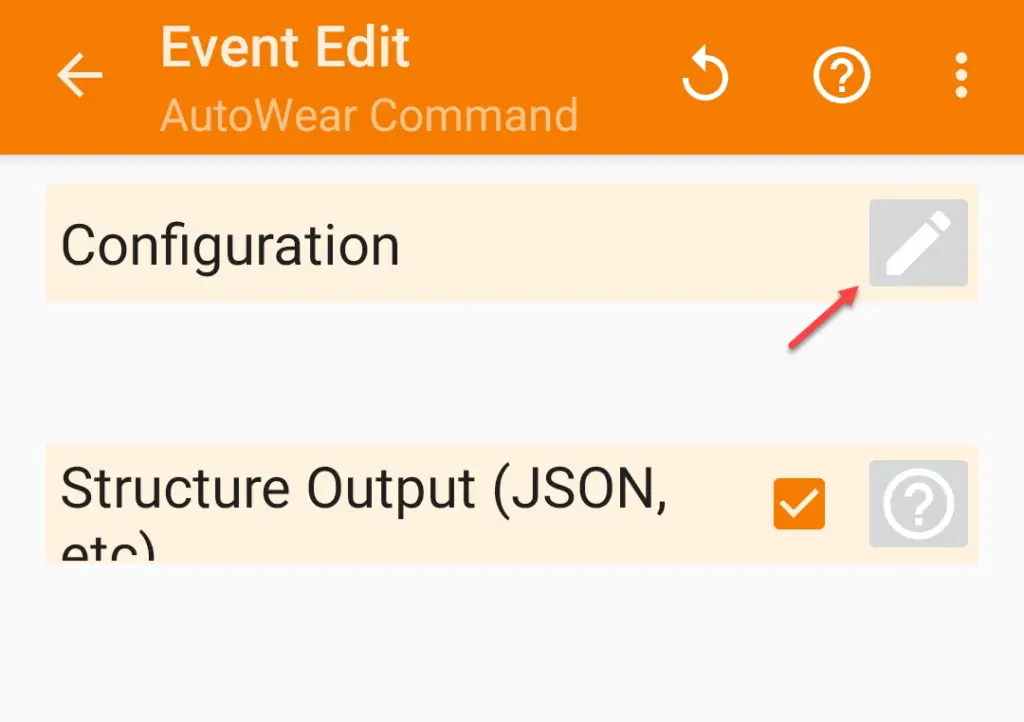
9. The Action Edit window should come up. First click on the little pencil next to configuration to configure the action.
10. You should now see the following window where you can add a Home Assistant installation by clicking on the + sign.
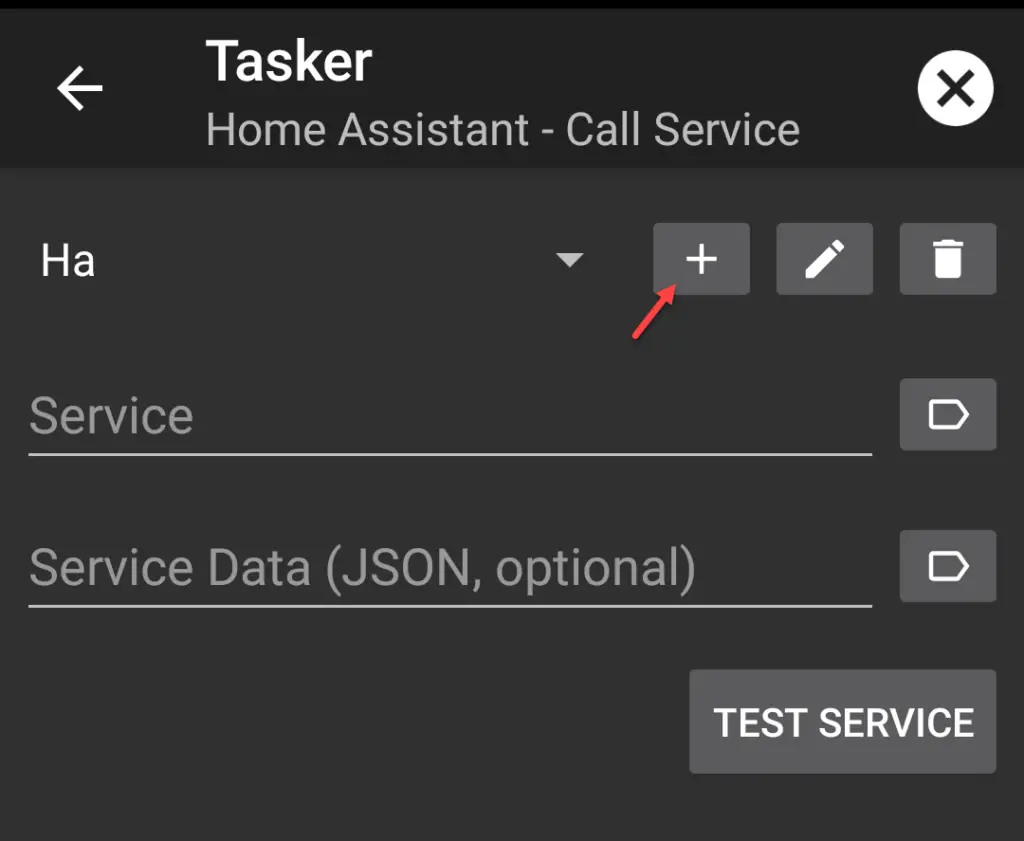
11. Within the Add a Server window you can enter the Server Name, base URL and Access Token. Here are some example values:
Server Name – Can be anything you like, for example I named mine HA.
Base URL – This is the URL of your Home Assistant installation. For example: http://ha.local:8123
Access Token – This is the Long-Lived-Access token that we created in step 1.
Now click on TEST SERVER to verify that your connection is working. You should be getting a Connection Successful message.
12. Click on the back arrow to return to the Call service edit window. We can now complement the task by specifying the service and the entity id that we would like to switch.
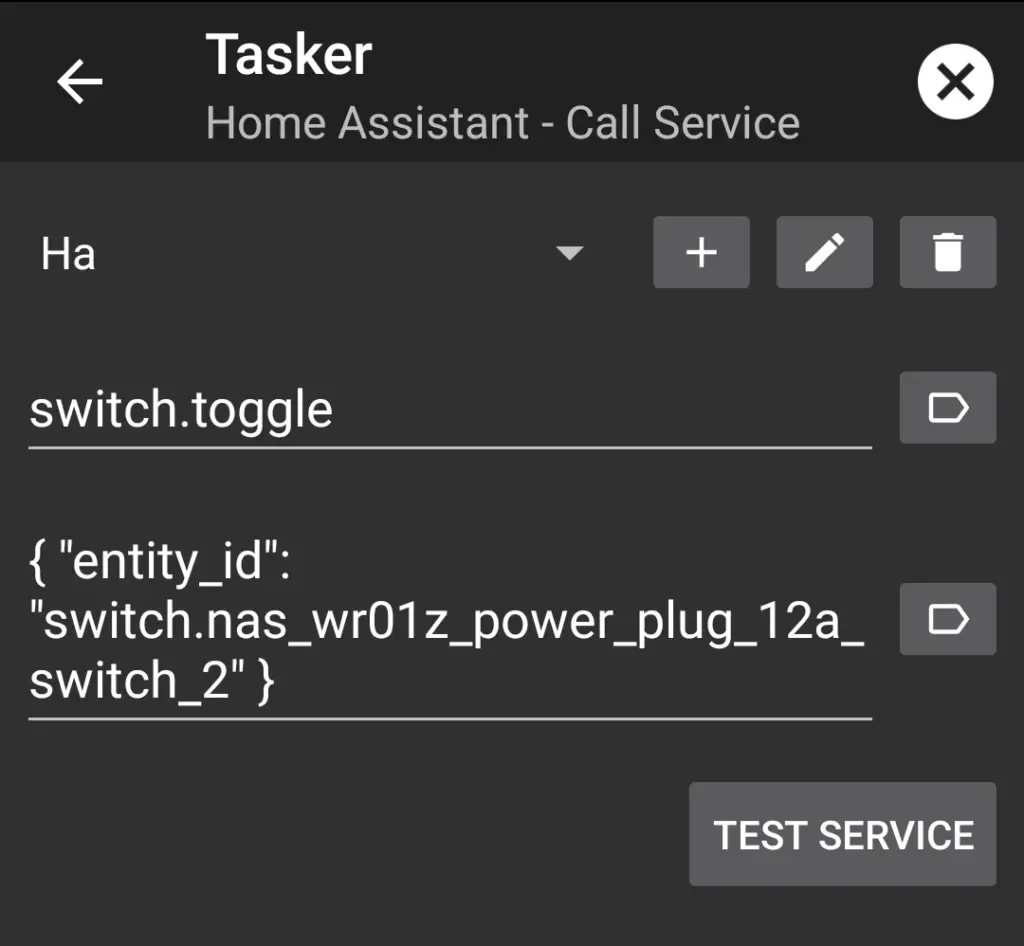
In the example above I am using switch.toggle, so I can toggle the switch from my smart watch. You can also use services like switch.turn_on to only turn the switch on. You can find the entity_id of your specific device in Home Assistant under Configuration => Entities. Please note that you need to specify the JSON syntax as you can see in the example.
13. Click on TEST SERVICE to verify that the light is actually toggling. Phew, now we can finally switch lights from Tasker using Home Assistant! If you run into some issues: don’t worry, just go over the steps once again and make sure you get every detail right. Go back to the Tasker home screen and save all settings. You should end up with a task that allows you to switch a light on and off.
Step 3: create a custom screen in AutoWear that calls the specified Tasker task
Now that we have a service created in Tasker we can call the service from AutoWear. To do this we need to take the following steps:
- First we need to create a profile in Tasker that actually gets the requested command and then calls the service accordingly.
- Next we need to create the actual screen in AutoWear that allows us to toggle the lights.
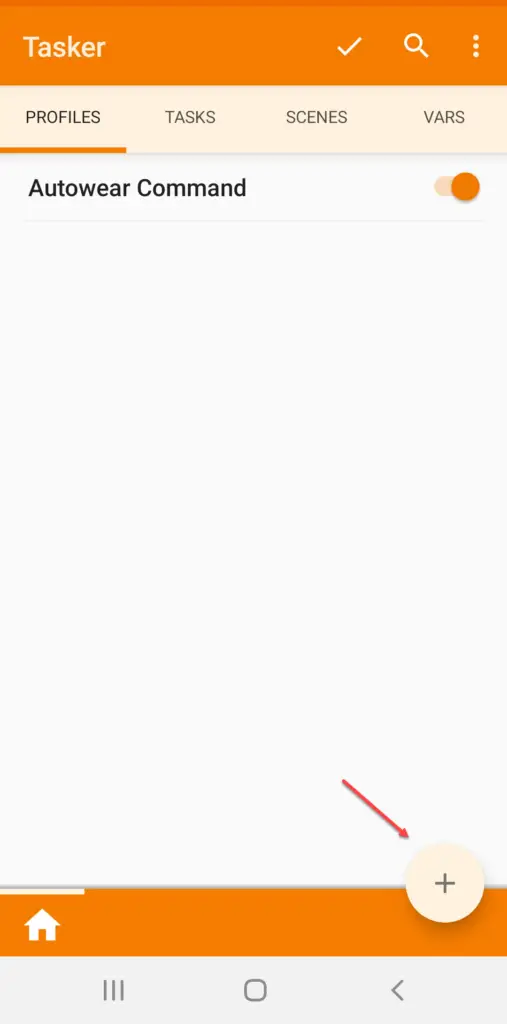
1. We start by creating a profile in tasker, that handles the commands send by AutoWear. To do so go to the profiles tab in Tasker, and click on the + sign to add a new profile.
2. From the drop down menu select Event, from the Event Category select Plugin. Then select AutoWear for the Event Plugin. You should end up int he Event Edit window. Now click on the pencil to edit the event configuration.
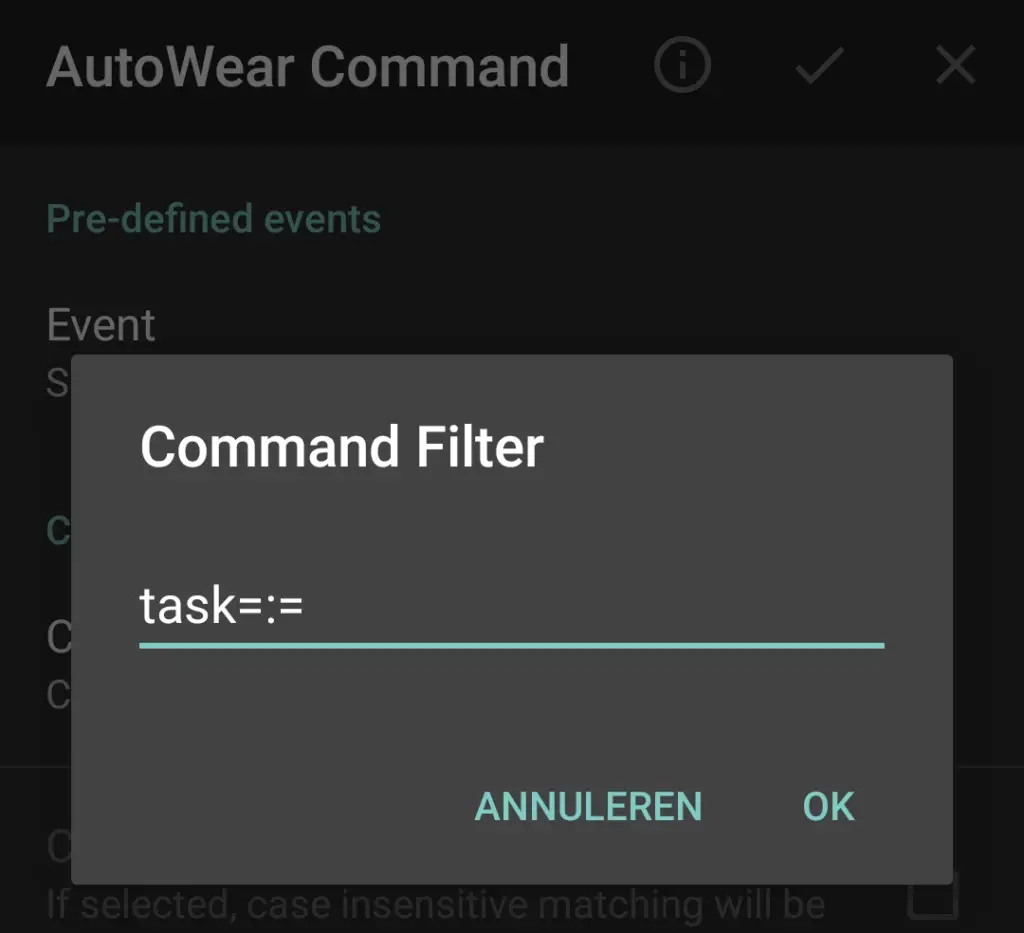
3. From the edit window click on Command Filter to edit the command filter. Enter task=:= as command filter. This command filter will handle all events containing task fired from AutoWear.
4. Click on OK this should return you to the edit window. Now click on the checkmark on the upper right. After that make sure you click on the return arrow. That should get you back to the main window. And it should show you a pop-up to create a New Task. It looks like this:
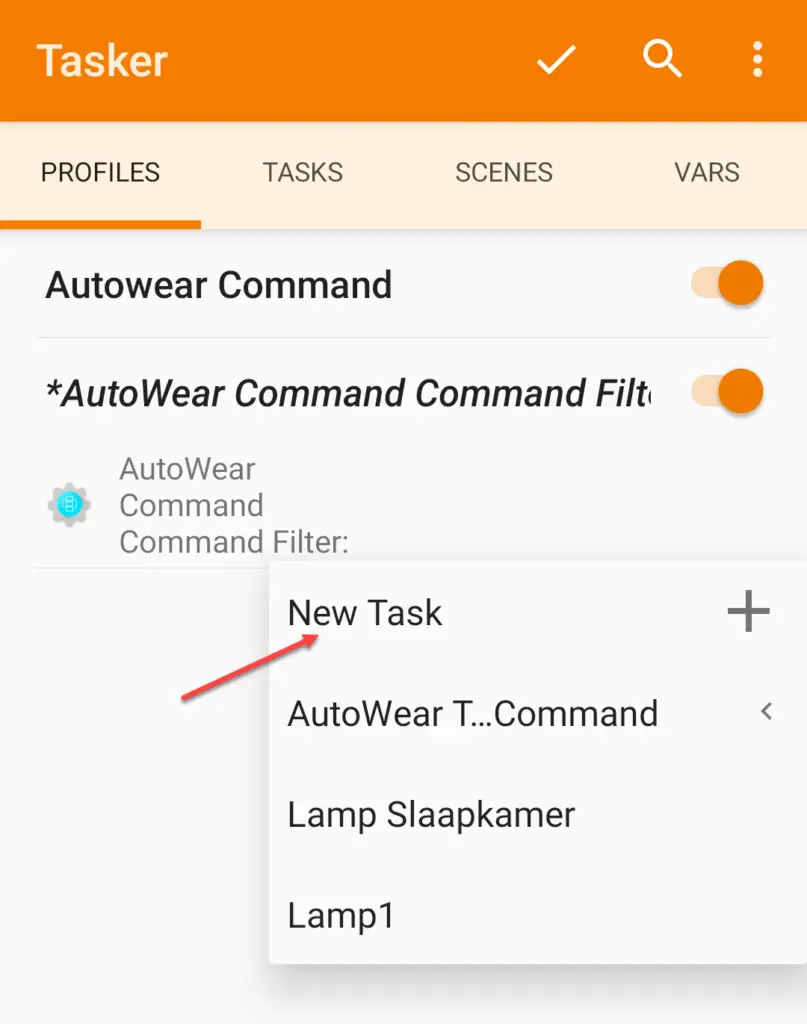
We are going to click on New Task.
5. You should now see the Task Edit window. Click on the + sign on the bottom right to create a new task action. For the Action Category select Task, for the Task Action select Perform Task. You should end up in the Action Edit window. Enter the following parameters:
We are done in Tasker. Make sure you go all the way back to the main screen, saving all your settings. Do not exit Tasker or you will lose your changes.
Now we need to configure AutoWear. This will be the actual screen that is shown on the Galaxy Watch 4. I used the list screen, but you can also play around with different types of screens available in AutoWear. Here are the steps required to create a list screen.
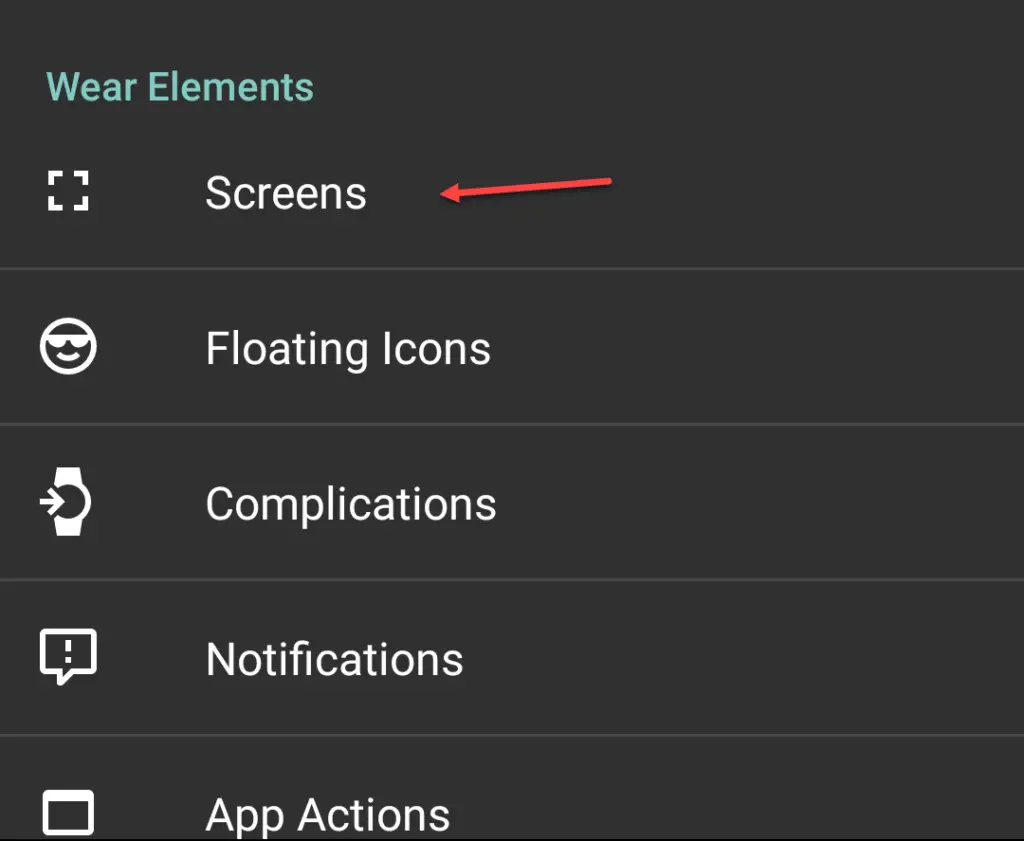
1. Open up AutoWear and click on Screens
2. From the screens window click on the + sign to add a screen.
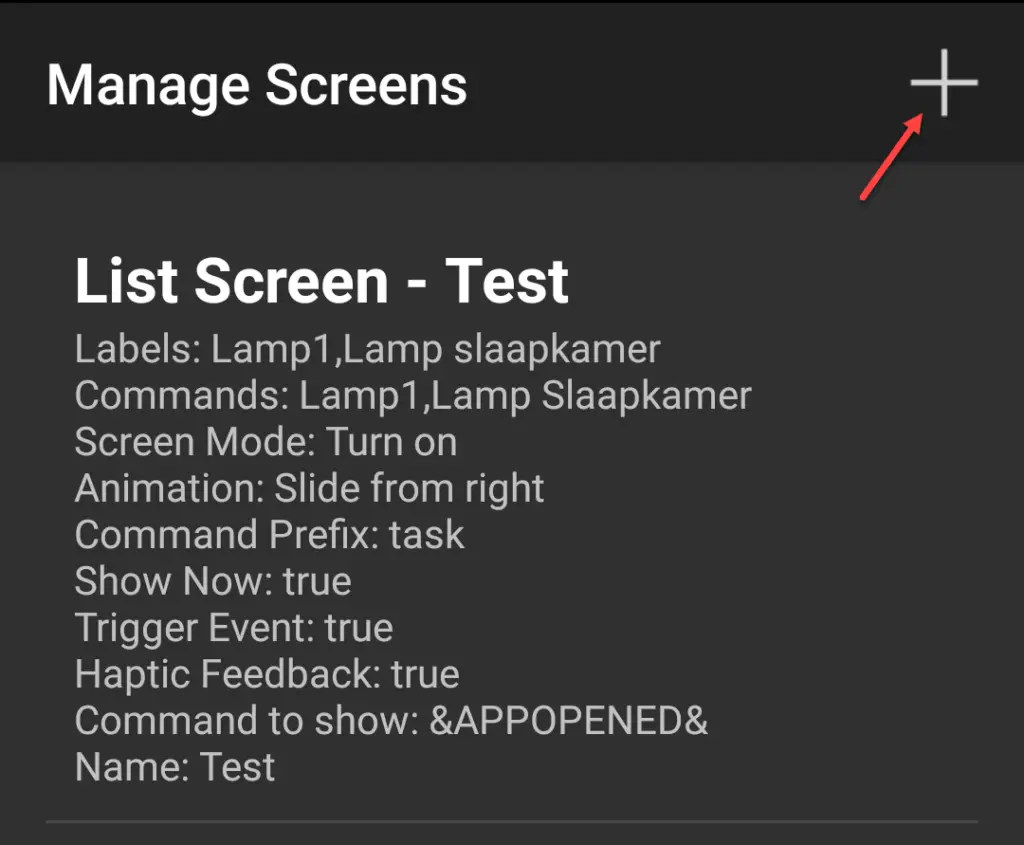
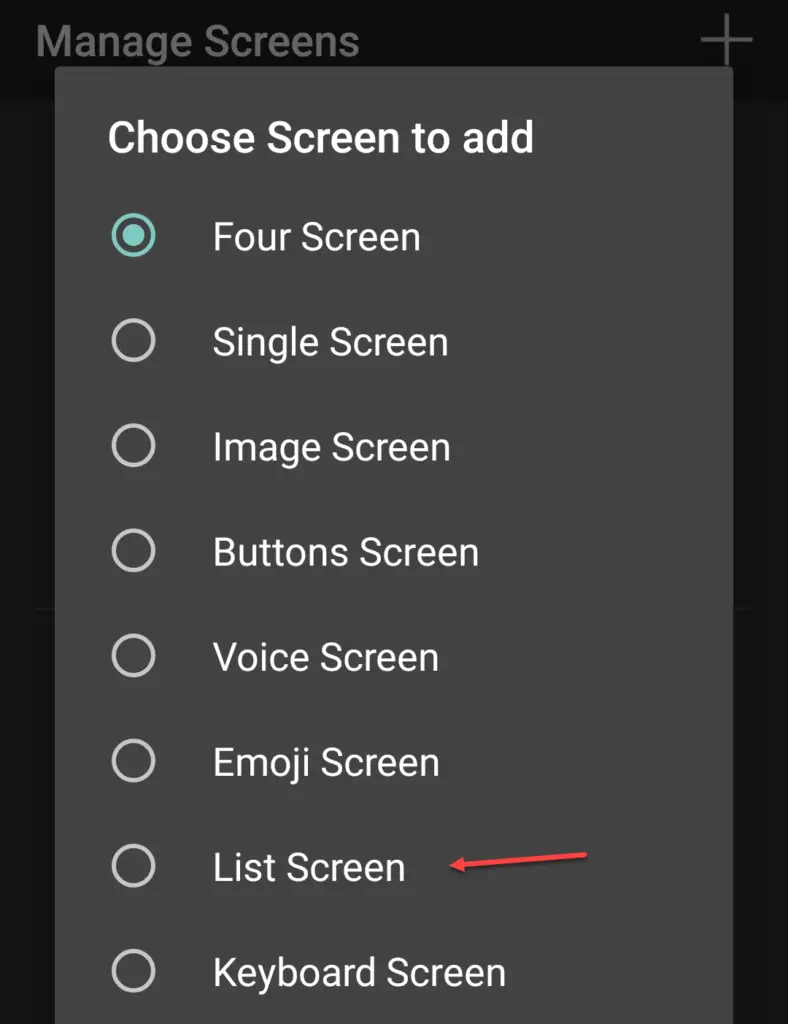
3. From the choose screen to add window, we are going to select the List Screen option.
4. On the list screen edit window, make sure you enter at least the following parameters (you can play around with others if you like). But these are the minimum required settings:
Screen name – Give the screen a meaningful name.
Labels – Enter the labels for each of the task that you would like to appear. Comma separated, for example: Light 1, Light 2.
Commands – Enter a comma separated list of tasks that you would like to appear. For example Light1,Light2
Command Prefix – This is the most important step, make sure you enter task here in order to match the filter that we created earlier.
Here is a more detailed example of each of the settings available:
| Setting | Explanation | Notes | Example value |
| Screen Name | This is a unique identifier for the screen. It used internally by AutoWear but not shown anywhere. | Home Assistant Screen 1 | |
| Commands to show | Select the event that causes the screen to be shown. | Click on yes to show the pre-defined events. You don’t need to change this. | “App Opened Automation” |
| Header Text | Text shown at the top of the screen. | You can use HTML formatting here, to change the layout of the header. | <br/>Home Assistant |
| Labels | The list of labels to show. | One for each entry that you want in the list. | Main light, another light |
| Icons | The icons to show in the list. | Select yes to get help with the file selection. | Select icons for each label entry in the list. |
| Commands | The list of commands to send for each entry when it is tapped. | Put in a list of task names as they appear in Tasker. | Light1,Light2 |
| Long Tap Commands | List of commands to send for each long tap entry. | You can use this, but I personally don’t use this. It is a bit weird to long tap for a light toggle. | |
| Double Tap Commands | List of commands to send for each Double Tap entry. | See above. | |
| Command Prefix | Text prefixed in each command. | task | |
| Trigger events | Check to enable sending the commands to Tasker | checked | |
| Text Color | Color of the text in the list. | styling | anything you like |
| Text Size | Size of the text in the list. | styling | default, or anything you like. |
| Background color | Background color of the screen | styling | anything you like. |
If you entered all the details, click on the checkmark to go back to the main screen.
Everything is done, you should now be able to test the screen from you smart watch! If you did it the right way you should end up like something like this as shown in the video:
Bonus: assign the AutoWear screen to a physical button
As you may hove noticed from the video, you can customize the hardware buttons of the Galaxy Watch 4 series. To do so go to settings, general and scroll all the way down. You should see a text that says “Are you looking for?”, and one of the options is customize hardware buttons. You can see a screenshot here (sorry it is in Dutch 🙂 ):

Now on the edit Window you can select the AutoWear screen application:

I assigned the double press button to AutoWear, so I can now conveniently start the screen to control my lights around the house.
Using Home Assistant on the Galaxy Watch 4 using Home Slide for Home Assistant
The second alternative method I explored is using Home Slide for Home Assistant. This application developed by Baptiste Candellier provides support for Android Wear OS out of the box. It aims to provide a more native Android application experience contrary to the Home Assistant app for Android that uses a embedded web approach. To get started with Home Slide, install it on both your watch and your phone.
There is not a lot of configuration that you can do in Home Slide. If you have the Home Assistant Android app installed, Home Slide will automatically detect your Home Assistant URL After opening it will show the Quick Actions menu that allows you to toggle devices directly. You can use the dots to edit the items that show up in the Quick Actions menu,.
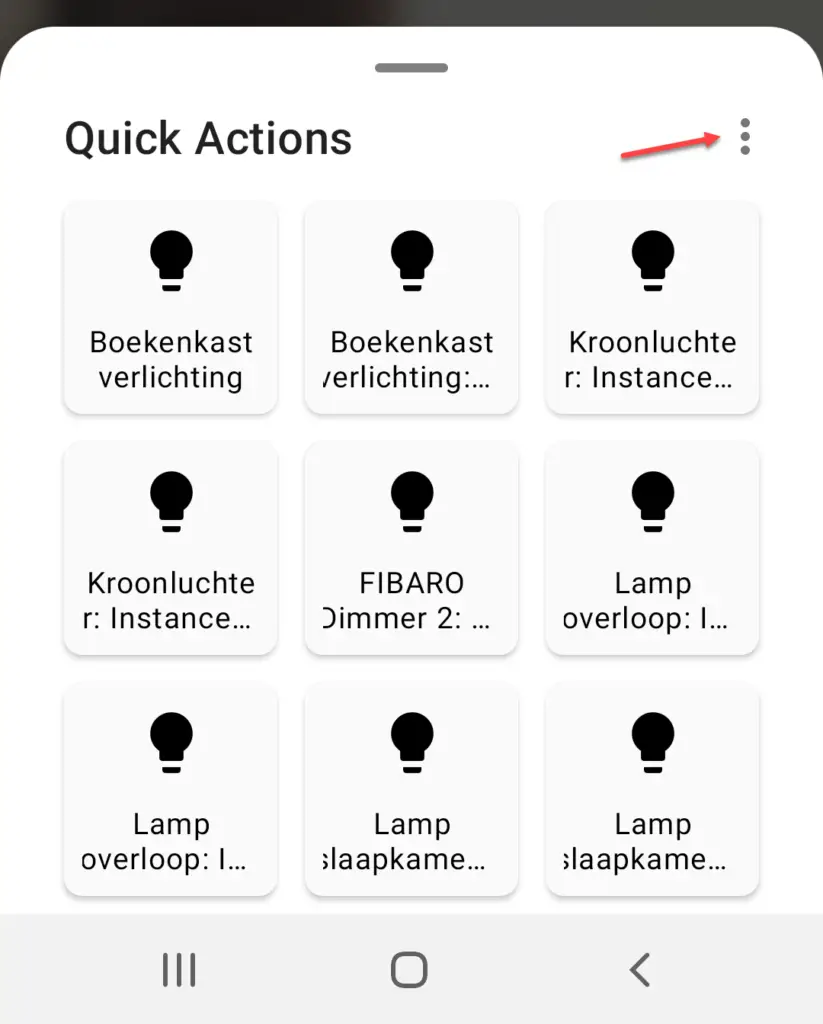
From the watch you can also access the same Home Slide Quick Actions menu. Home Slide provides a nice way of switching lights from your Samsung Galaxy 4 Smart Watch. But it does not provide a lot of customization options. If all you want is just switching some lights, Home Slide is probably the most easy option.
When will the Home Assistant Wear OS application be released?
Though we have now two methods available to start controlling our Home Assistant entities from our smart watch. It would ultimately be nice to have a native Home Assistant Wear OS application. As stated before the Wear OS app is currently into development. And development has been inactive since December of 2020. My expectation is that development will proceed now that more premium smart watches based on the Android Wear OS 3 platform are getting released. But time will tell. In the mean time at least you have some options to control Home Assistant from your smart watch.
Conclusion and wrap-up
In this article we took a look at the options to control Home Assistant from a smart watch. Currently there is no official Wear OS application, but using some third party tools you can actually control lights from your smart watch. The method using Tasker is a bit more complex, but allows more customize-ability. Where as the Home Slide method is easier, but does not allow a lot of customization.
I will update this article accordingly if there are new methods to control Home Assistant from your smart watch. Hopefully we see a native Home Assistant app in the near future.
One thought on “Using Home Assistant with Wear OS 3 on the Galaxy Watch 4”
Comments are closed.
Recent Posts
Microsoft 365 Defender cross check with on-premises Active Directory
Recently I was reviewing the new Microsoft 365 Defender portal and I noticed that a few endpoints were missing from the device inventory. This got me thinking that it would be great if I could...
You have probably been using Home Assistant for quite a while, but lately you have wondered how to enable remote access to your Home Assistant installation. This is a very common question and one way...
Galaxy Watch 4: AutoWear – creating screen – error saying your watch is not connected.