Today I received new Jeenodes, so it’s time for more electronics fun 🙂
One thing that I head in my head for a while was an infrared receiver and sender.
I want it to be like an advanced Logitech Harmony, the main downside on the Logitech Harmony is that there is no status tracking.
What happens if the TV is already on, and your Harmony tries to turn it “on”? (right.. *poof* your TV just got powered off)
So, in my opinion an ideal remote has integration with my home automation system, and keeps tracking of device statuses (I can use Plugwise for example to determine if my TV is powered on or off)
And what to think about turning on the TV on at your preferred time on your preferred channel? (imagine waking up, stepping inside the living room and have the morning news ready for you.. )
Enough introduction, let’s dive into the hardware…
Hardware used
1 x Jeenode
1 x USB-BUB
1 x Vishay TSOP 1838 IR receiver (datasheet: http://www.datasheetcatalog.org/datasheets/134/301155_DS.pdf)
1 x Breadboard
Some jumper cables, to connect stuff around…
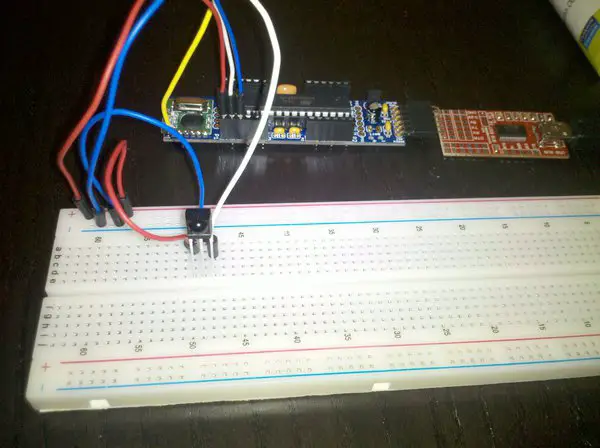
Here’s a picture of my initial setup:

Image 1: Jeenode connected to IR receiver module.
Software
I quickly wanted to get started, so I google’ed around a bit.. until I found this nice IR library: http://www.arcfn.com/2009/08/multi-protocol-infrared-remote-library.html (nice work Ken!)
This library provides a few basic IR protocols (NEC, Sony and RC5+6)
There is a test sketch included with the IR library called IRrecvDump which is nice for debugging.
I tested out several remotes I had laying around here (logitech, xtreamer, samsung tv, dreambox sat receiver) unfortunately only the xtreamer remote uses the standard IR protocol.
My main goal is to control my TV so I started ‘hacking’ on that IR protocol first…
Samsung IR protocol
My TV remote is a Samsung BN59-00609A, I had some luck that this remote is included within LIRC (http://www.lirc.org) which has an excellent library of remotes.
“All” I had to do is modify some of the existing IRlibrary code. This took me well over 2 hours 🙁
This is the modified routine to receive the Samsung IR protocol (it looks like an extended NEC protcol):
long IRrecv::decodeSamsung(decode_results *results) {
 long data = 0;
 int offset = 1; // Skip first space
 // Initial mark
 if (!MATCH_MARK(results->rawbuf[offset], SAMSUNG_HDR_MARK)) {
 return ERR;
 }
 offset++;

 // Check bits
 if (irparams.rawlen < 2 * SAMSUNG_BITS + 4) {
 return ERR;
 }

 // Initial space
 if (!MATCH_SPACE(results->rawbuf[offset], SAMSUNG_HDR_SPACE)) {
 return ERR;
 }
 offset++;
 Serial.println("OFFSET");
 Serial.println(offset);

 for (int i = 0; i < SAMSUNG_BITS; i++) {
 if (!MATCH_MARK(results->rawbuf[offset], SAMSUNG_BIT_MARK)) {
 return ERR;
 }
 offset++;
 if (MATCH_SPACE(results->rawbuf[offset], SAMSUNG_ONE_SPACE)) {
 data = (data << 1) | 1;
 }
 else if (MATCH_SPACE(results->rawbuf[offset], SAMSUNG_ZERO_SPACE)) {
 data <<= 1;
 }
 else {
 return ERR;
 }
 offset++;
 }
 // Success
 results->bits = SAMSUNG_BITS;
 results->value = data;
 results->decode_type = SAMSUNG;
 return DECODED;
}
And here are the used variables:
#define SAMSUNG_HDR_MARK 4500
#define SAMSUNG_BITS 32
#define SAMSUNG_HDR_SPACE 4500
#define SAMSUNG_BIT_MARK 560
#define SAMSUNG_ONE_SPACE 1600
#define SAMSUNG_ZERO_SPACE 600
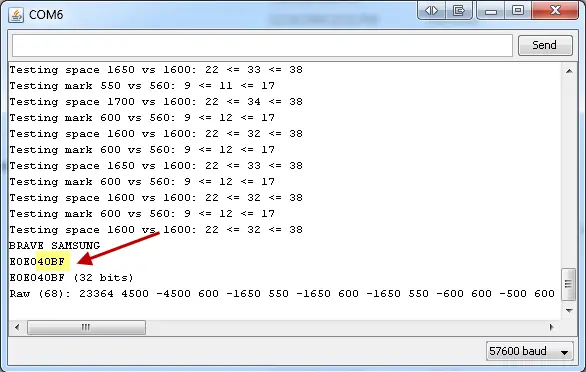
Here is an example decoded button press (on/off button):

Image 2: Example key press in Arduino serial monitor.
According to the LIRC file 40BF maps to:
POWER 0x40BF
Voila! We got a match.
Next up is actually sending out the actual commands for my remote, to completely replace it. To be continued!

thanks maarten, just got this working perfectly with my samsung tv (LE23R71B). You are a star!
Only to help others: (1) the ‘define variables’ need to be dropped into the IRremoteInt.h file (at the top). (2) Within the IRremote.h file the line “long decodeSamsung(decode_results *results);” needs to be added after the same NEC, Sony, RC5 and RC6 lines. (3) the following section needs to be dropped into the IRremote.cpp file:
#ifdef DEBUG
Serial.println(“Attempting Samsung decode”);
#endif
if (decodeSamsung(results)) {
return DECODED;
}
Well done, Ben
The lines 20 and 21:
20 Serial.println(“OFFSET”);
21 Serial.println(offset);
are simply for debugging and can be deleted?
Does this “offset” have any purpose after decoding?
These lines are solely for debugging indeed.
Offset is used to keep track of the individual bits within the package, but not used after decoding.
Excellent work.
By the way, you should also add:
#define SAMSUNG 5
In IRremote.h in the section “// Values for decode_type”
Please i want the codes of each function in hex format, for example “E0E040BF” for power on/off function coz i can’t understand the raw data code…… i success ed to perform On/off power for my TV Samsung LCD monitor…..please help & support as fast as possible or give example to show me how to decode raw data codes
Thanks alot
hie there , i m a beginer with arduino … so plz plz plz can u explain me that how can i use this code to recieve inputs from my samsung tv remote …. like where to write this code aand how to dump it on arduino uno … its very important for me …. plz plz plz help me ….
Hi,
Thank you very much!!!
thanks to your code I could do the send!
void IRsend::sendSamsung(unsigned long data, int nbits)
{
enableIROut(38);
mark(SAMSUNG_HDR_MARK);
space(SAMSUNG_HDR_SPACE);
for (int i = 0; i < nbits; i++) {
if (data & TOPBIT) {
mark(SAMSUNG_BIT_MARK);
space(SAMSUNG_ONE_SPACE);
}
else {
mark(SAMSUNG_BIT_MARK);
space(SAMSUNG_ZERO_SPACE);
}
data <<= 1;
}
mark(SAMSUNG_BIT_MARK);
space(0);
}