About one month ago I ordered a Horstmann HRT4-ZW thermostat. I came across this z-wave thermostat while I was surfing across the web. As far as I know this is the only EU thermostat available right now. Some of the features I like and I was looking for in a z-wave thermostat:
- Control the setpoint
- Get a setpoint report when it is manually changed (also notifications of battery levels and the room temperature)
- Get the actual room temperature
There are several posts on the Micasa Verde and Homeseer forums that device is not working in their software, despite this fact I decided to take the risk and order this device. The total cost including shipping costs was just under €100.
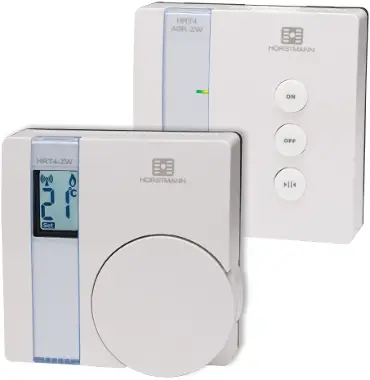
The HRT4-ZW is a thermostat system that consists of two devices, one controller (the user side of the system, where you control the set point etc.) and a receiver (this one needs to be attached to your HVAC system). Here’s a picture of both devices:
Getting my feet wet: the first steps
The first step I took when I got the device was creating a test setup, I connected an old PC power supply cable to the receiver (it needs 230v). Put in the batteries of the controller device and I was good to go! I decided the first step I had to take was getting values from the device (temperature, current set point and battery level as a bonus). Horstmann has provided detailed z-wave information in a separate document, available here.
One of the requirements for me was to include the controller device into my existing z-wave network, that appears to be a pretty trivial task. But, it turned out it was one of the most difficult tasks.
I completely read through the z-wave document over and over again, but after 2 evenings of playing around with I was about to give up. The L mode as described in the document does include the controller within an existing z-wave network, but that loses the connection with the device that you attach to your HVAC.
Separately re-associating that unit is not an option as the network button on the device does not do anything. Or, maybe it can be used?
I figured out that once you put the controller unit into ERASE mode, the receiver network LED will blink as if it is ready for association. This turned out to be the key to getting both nodes included within my existing z-wave network! Here are the steps in detail:
1) Put the thermostat into program mode (dip switch 1 into position ON)
2) Select the P option, double click the rotary wheel until PP appears on the display.
3) Now go to the E, for ERASE mode. Click the rotary wheel once again until the E starts blinking.
4) At this point the receiver network LED should be blinking, this means the node is ready for inclusion.
5) Now, remove the batteries from the controller! Yes, just do it 🙂
6) Include the receiver by pushing the include button on your z-wave network stick (in my case an Aeon Labs z-stick), after that press the network button on the receiver until the ON led starts to blink.
7) The receiver is now included!
8) Include the controller by using the L function as described in the z-wave documentation.
You should now end up with two thermostat devices in your z-wave network. Here’s a screenshot from HouseAgent:
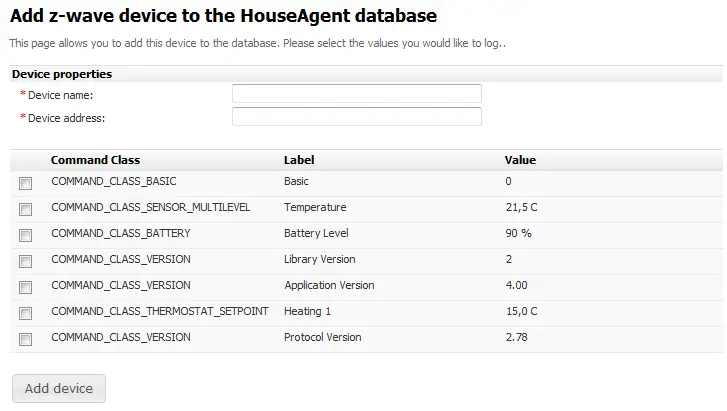
Node number 3 is the receiver and node 4 is the controller. Node 3 is quite useless (it doesn’t report any z-wave classes, except basic) but it needs to be included within the same network in order to work with the controller. Here are the z-wave classes reported by the controller, again a screenshot from HouseAgent:
Please note that the controller is a sleeping z-wave device, requests for this device need to be queued until the device comes available. The device will send a wakeup notification once it comes online. You can queue commands to the controller, and when it gets online send these commands.
Associations
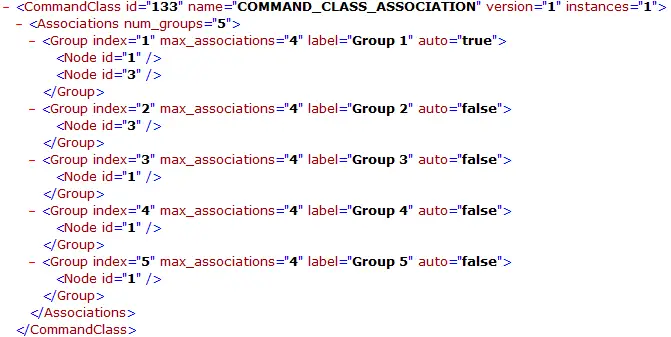
In order to receive updates from the controller once a value changes you need to set associations. The thermostat supports associations for unsollicited room temperature, setpoint and battery reports. I set associations for each of these reports to my z-wave stick. Here’s an overview of my configuration (more information of the specifications of these groups can be found in the Horstmann document):
Setting the setpoint
This was my final task to be actually able to control the thermostat. Because this is a sleepjng device commands need to be queued, this was an easy thing to do in open-zwave. The problem was however that my Python z-wave wrapper had no support for setting values.. yet. I commited a new version of my open-zwave python wrapper, with setvalue support to github!
Here’s an example of the setvalue command being executed after the device woke up:
2011-05-19 20:10:01:771 Received Wakeup Notification from node 4

2011-05-19 20:10:01:772   Node 4 has been marked as awake

2011-05-19 20:10:01:774 Queuing command: Set Thermostat Setpoint (Node=4): 0x01, 0x0c, 0x00, 0x13, 0x04, 0x05, 0x43, 0x01, 0x01, 0x01, 0x0f, 0x05, 0x09, 0xa0

2011-05-19 20:10:01:817 Sending command (Callback ID=0x09, Expected Reply=0x13) - Set Thermostat Setpoint (Node=4): 0x01, 0x0c, 0x00, 0x13, 0x04, 0x05, 0x43, 0x01, 0x01, 0x01, 0x0f, 0x05, 0x09, 0xa0

2011-05-19 20:10:01:822   ACK received CallbackId 0x09 Reply 0x13

2011-05-19 20:10:01:825   Received: 0x01, 0x04, 0x01, 0x13, 0x01, 0xe8

2011-05-19 20:10:01:828   ZW_SEND_DATA delivered to Z-Wave stack

2011-05-19 20:10:01:838   Received: 0x01, 0x05, 0x00, 0x13, 0x09, 0x00, 0xe0

2011-05-19 20:10:01:840   ZW_SEND_DATA Request with callback ID 0x09 received (expected 0x09)

2011-05-19 20:10:01:845   Expected reply was received

2011-05-19 20:10:01:869   Message transaction complete
Physical/electrical connections
I was unsure about the electrical connections required from the receiver to my HVAC, so I decided to hook up two wires to the points I expected to be the required connections. After that I tested it with the continuity function of my multimeter. Here’s a video of my test setup:
Parameters
One more sidenote, there are two configuration parameters available. Configuration parameter 1 must be set in order for room temperature reporting to work! This does not work out of the box..
This concludes my long post about this thermostat, next up for me is creating a nice GUI for it… now that I got everything figured out.
You can buy Z-wave thermostats here.
6 thoughts on “Horstmann HRT4-ZW Thermostat”
Comments are closed.
Recent Posts
The time is finally come! Samsung have released their Galaxy Watch 4 series of watches. It features Google Wear OS 3. and it comes in two models, being the standard model and the watch 4 classic. In...
Microsoft 365 Defender cross check with on-premises Active Directory
Recently I was reviewing the new Microsoft 365 Defender portal and I noticed that a few endpoints were missing from the device inventory. This got me thinking that it would be great if I could...


Nice work, Maarten!
I am looking to install a Z-Wave (or comparable) thermostat to eventually install a wifi-controllable thermostat. As far as I understand right now, the minimum window of 4 minutes (256s) screws up the Z-wave setpoint, since it’s reset to the handsets value instead of the Z-wave setpoint (if that makes any sense……).
Do you know if Homeseer / Vera now supports this device? I like it!
Maarten,
Do you think that thé AS-RF thermostat from Horstmann works also ? It supports z-wave too and it can be programmed with profiles.
Thanks
Yes, this model is also supported. I am not sure about the profiles though.
Hoi Maarten,
Ik overweeg ook om de HRT4-ZW aan te schaffen. Ben jij na meer dan een jaar nog steeds tevreden over deze thermostaat, niet alleen qua Z-Wave functionaliteit/stabiliteit maar ook gewoon het correct meten en regelen van de temperatuur?
Alvast dank voor het delen van je ervaring,
Gijs
Hello Maarten,
I am very interested in this setup, however I would require using 3 of these horstman pairs for my central floor heating system.
Did you have 1 horstman connected or more then 1?
For my goal to work I would need 3 horstman thermostats, all connected to one z-wave usb stick.
Appreciate any response on this subject.
Hell Maarten,
When you associated the thermostat’s group 2 with your Aeon z-stick, do you get reports for the status of the “call for heat” (flame) symbol?
I have one of these connected to Vera but unfortunately I cannot see the when the thermostat (not the actuator) is calling for heat.
Thanks!
mgb